Wednesday, May 18, 2011

CRAZY WITH STRESS... NO SWEAT!


FEELING STRESSED???


SO! How do I deal with my CRAZY STRESS? Do you remember the ‘Magic Carpet Bag” that Mary Poppins carried to her new “Nanny Job”? She pulled a plethora of magical items and tools from the depths of her bag to help her with her new ‘charges’, Michael and Jane! Well, Over the years, I have developed my OWN “CRAZY CARPET BAG” full of ideas and methods, that help me deal with my ‘stress filled’ moments! 


Today, my stress is a simple matter of my work day, running home to teach 2 hours worth of private violin lessons, then packing for a trip for which I leave tomorrow on a bus at 6 a.m. And the kicker- I will be chaperoning 24, 5th graders for 3 days. I am SO thankful that these are some of the BEST of the BEST students at my school ~ and we are going to Orlando ~ FUN. Then I have to hop on a plane, Sunday morning at the crack of dawn, and PRAY that it is a smooth, ON TIME flight, so I will be home in time to attend my babies graduation (oh yeah…. Add purchasing waterproof mascara to my list of things to do ~ YIKES)! Did I say this was SIMPLE STRESS! Oh My! Where is the chocolate??? 


With a list like this, I could SERIOUSLY develop a ‘booger of a blood pressure’ problem, or maybe some deadly ‘unmentionable’ digestive issues, or a ‘MAJOR Migraine’. BUT ALAS, I am going to share with you my ‘carpetbag’ full of tips and tricks that help me deal with stress, and I am going to provide some links that I have gone to, in an effort to find these tips and tricks!


My first plan that I put into place is: a reflective time. This reflective time does not have to be a long extended period of time, but it is a time to relax, reflect, and calm the senses. I have spent time in prayer and meditation, I have taken a bubble bath complete with candles and music, I have completed many a yoga session (Love me some yoga)! I have also from time to time treated myself to a massage, but no matter what method I choose to reflect and relax, I always begin with the following scripture verse: 

Philippians 4:6-7 
Do not be anxious about anything, but in everything, by prayer and petition, with thanksgiving, present your requests to God. And the peace of God, which transcends all understanding, will guard your hearts and your minds in Christ Jesus. (NIV) 


This starts my time of reflection off on a positive note, with a positive promise. IF I am not anxious, but spend time in prayer, God will grant me peace. I find that my time of reflection is more profitable when I begin it with this wonderful verse of scripture. 


After my time of reflection, my mind is now more alert and clear to think about the ‘stressfilled’ situation facing me. SO, next step: I have created a notebook from a composition book (oh so cheap)! I decorated my composition book with a positive phrase, cute stickers, my personal initials… just something FUN for me to look at! I call this my BRAIN BOOK! Now that my brain is clear from my ‘reflection’ time, I can sit down with my brain book, and usually of course a cup of Chai Tea (yummo), and label each page with the date at the top (I usually do a week at a time). I begin listing things I have to do on a daily basis: extra jobs, phone calls, errands, ANYTHING that I need to accomplish over the course of the week! This gets everything I need to do OUT OF MY HEAD and into my Brain Book ~ once again clearing my brain! I am a very visual person, so for fun, I use stickers, and I will use colored highlighters to mark things off as I accomplish them. It always makes me feel good knowing that I am accomplishing the necessary things on my list, and it also helps me to remain organized, and being organized creates less stress! 


After I have had my ‘brain book’ session, before DIVING into my list, I take some time just for me. Ways that I make some time for myself include: spending time with my family, taking walks, doing a craft project, reading, calling a friend, exercising, cooking, writing, taking some pictures… anything that relaxes me and helps my mind, body and soul to remain calm. 


NOW! I feel less stressed and mentally ready to begin tackling my list in a clear, organized, methodical, and ‘less’ stressed manner. I can accomplish SO much more, when I have mentally prepared and organized myself to accomplish a big goal! 


Another tip once you begin your work, if you already know that the task you are starting on is one that may cause your’ ‘internal temperature to RISE’, set your timer and work on that difficult task for maybe 15 minutes, and then take a ‘small personal break’ and come back to it! This makes any task that is ‘crazy scary’ a lot more manageable! 


"STRESSED IS DESSERTS SPELLED BACKWARDS"


Here is a great medical link that details stress ‘symptoms’, although I am quite sure you already KNOW if you are stressed, but it also has other GREAT ideas for ways to relieve stress that I have not even covered. I have simply told you the things that work for me! 


I am also including prayer that I found online. I keep a copy of this in my purse and refer to it often. In fact, I had it laminated so it won’t be messed up jingling and jangling around with the rest of my purse contents! 

"Dear Lord, 
I need you now because I am full of stress and anxiety. Reading your Word brings comfort, as I ask you to come and take my heavy burdens. I take each burden, one by one, and lay them at your feet. Please carry them for me so that I don't have to. Replace them with your humble and gentle yoke so that I will find rest for my soul today. I receive your gift of peace of mind and heart. Thank you that I can lie down tonight in peace and sleep. I know that you, Lord, will keep me safe. I am not afraid because you are always with me. Please keep me daily, Lord, in your perfect peace. 
Amen" 

I found this prayer at the following link: 
I totally believe in, and have benefitted from the power of prayer. 


SO my friends, if the STRESS MONSTER is staring you in the face, remember that with a clear mind, a well laid out plan, and a calm spirit you can accomplish anything! 


“Today is your day! Your mountain is waiting. So... get on your way.” ~ Dr. Seuss


Living, Laughing, and Loving my less stressful week,


Patti


Tuesday, May 17, 2011

CRAZY CRAFTING WITH MOSAIC TILE!


WHAT A CRAZY BLAST I had with this Crazy, Creative, Mosaic Tile Project. I have always loved working with tile, because PERFECTION is NOT a necessity, haphazardness in design is encouraged, and the sky is the limit as far as creativity goes! WOOT~ what more can a 'crazy' craft lover ask for?


When picking my latest mosaic project, I thought I would start with a trip to the second hand store (one of my FAV places to shop) and I found this ADORABLE letter Caddy for $2.50! There were several things I loved about this little steal of a deal: a) It has recessed areas for TILING, b) it has a slide up and in lid like a roll top desk, c) I loved the light color of wood, considering that I wanted to use some darker tiles and it would contrast so beautifully. Most people would see a simple box made of wood, I saw a box with a 'beautific' outcome! =) Expand your mind when you go to second hand stores. You need to 'look beyond' the initial presentation of what is being sold to, what the item can become!


So, I have my 'base', my box, now I need my materials. Several years ago, I turned to a wonderfully informative book for beginning mosaic 'tilers' like myself! And this is the best book around! Heidi Borchers'  "Beginner's Guide to Mosaics". I found this book at Hobby Lobby, but I know you can also order it on Amazon, and you might even want to check Ebay. Here is a description of the book: Leisure arts-Mosaics are a snap to create-especially when your teacher is Heidi Borchers! Heidi has developed a simplified approach to the art form that will have you creating lovely tile and glass inlays. from small gift items to enchanting garden enhancements there are designs to please everyone. use an array of materials to transform a variety of surfaces with the time-honored skill of mosaic crafting-made easy. 
( paperback: 44 pages)


I used this book to make my list of things needed, and some ideas about what to put on my box. Here is a basic supply list for any tile project:
  • the 'base' that you will be tiling (mine is the letter box) 
  • Wheeled Tile Nippers (purchased at any craft store) 
  • A Glass Adhesive (I use "Glass, Metal and More by Beacon Adhesives) 
  • Mosaic Tiles of your choice (they can be found in ANY craft store ~ and I am working with pink, green, purple and white) 
  • goggles 
  • gloves 
  • Grout (I used MOSAIC MERCANTILES Mosaic Tile Grout ~ I loved it because it was premixed) 
  • Craft stick or plastic putty knife 
  • grout sealer with sponge 
  • tracing paper 


To begin, I covered my work area with Kraft paper to protect my work surface. For the top inlaid portion of my box, I chose to do a very simple pattern of 'whole' tiles in 4 colors ~ green, pink, purple and white, and I chose to lay them in a simple diagonal pattern. Using my tracing paper, I cut a piece of paper the same size as the inlaid section of the box. I laid my tracing paper on a flat surface and then laid out my tile pattern on the tracing paper to make my design, and make sure it would fit in the inlaid slot. I then photographed the layout so that I would have something to refer back to as I began gluing pieces into place. I began gluing my pieces in place, placing the top row first, and then one side. I then slowly filled in the rest. You only need a small dollop of your adhesive, as you do not want the glue to show around your tile pieces. Also, make sure you leave a small space between the tiles for the grout. After all of your pieces are glued into place, you will want to allow sufficient time for the glue to dry before grouting. I decided to design, create, and glue the front portion of my box first before beginning the grouting process. 


For the inlaid portion on the front of my box, I chose a design from the Basic Mosaic Book as a 'general' guide for my project. I NEVER stick with a set pattern, as I like to make my OWN CRAZY CREATIONS! But I did choose a 'heart' pattern to go onto the front of my box. I liked the shape of the heart, and knew it would fit on my box along with the border I wanted to create around the heart. Once again, I cut a piece of tracing paper the size of the boxes front inlay, and I cut a second piece where I would draw my heart. From the back of the “Beginner’s Guide Book”, I traced the heart pattern from the ‘reflective heart’. (p. 41) onto the second piece of tracing paper, and I cut the heart out of the tracing paper and traced it directly onto the surface of my wood. I then laid the ‘inlaid’ piece of tracing paper out on a flat surface, and began laying out my border around the edge of the paper. I used the green and purple tiles to form the border. NOW for the FUN part! 


laid them in place, and once again photographed my tiles so I could replicate the placement when gluing the pieces in place. 


Here is a GREAT LINK for the proper way to use 
your Wheeled Tile Nippers:


When all was cut and placed, I laid the box down so the front of the box was facing up, and I began gluing the border in place. Next, referring to my photographs, I glued the heart into the heart that 
was traced on the wood. Then referring to the photograph of the outlined portion of the heart, I glued those pieces into place. When all was glued into place, I let the box rest right where it was so the tiles would dry and not shift. 


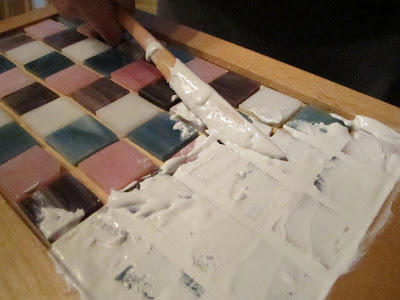
Next comes the grouting. Because I use a premixed grout, I did stir it well before applying it. Using my craft stick, I worked quickly to apply the grout between the mosaic pieces, filling in all the spaces. Then using my sponge grout sealer (with sponge on other side), I ran it completely over the tiled surfaces to fill in every nook and cranny. 


Once the entire project was grouted, I began at the top of the project, and using a slightly damp sponge I rubbed it gently to uncover the tiles and smooth out the grout. Don’t wipe the pieces too much, but leave a grout haze on them. 


I allowed the haze to air dry or if I am in a hurry, I will use a hairdryer on low for several minutes until the haze is dry and looks chalky. I am careful to avoid the damp grout between the pieces. Then using a dry paper towel, I clean each mosaic piece separately. If needed, you can use a cotton swab for any detailed cleaning. I allowed my grout to dry overnight. And then I use vinegar on a cotton swab to clean up any tiles that still have any remaining haze.


And now you see the finished product. SO CUTE… SO EASY… SO INEXPENSIVE. When using mosaic tile your projects are endless, and fun. I hope you will see how easy mosaic tiling is, and how much fun it can be for you to create your very own CRAZY MOSAIC TILE MASTERPIECE! Just a reminder, that the book, Heidi Borchers’ “Beginner’s Guide to Mosaics”, is an incredible resource when you are getting started, so you may want to pick up your own copy. 


Now, trying to decide what creative project, trip, or recipe to share next…. SO MANY CRAZY POSSIBILITIES! Hope you will join me again soon. 


Living, Laughing, and LOVING the “Crazy Colorful Mosaic’ called my life, 


Patti 


Here is a little stool that I tiled to go in my foyer. On this stool, I actually used china plates from the second hand shop ~ broke the plates into pieces, and combined with other tiles. I also got the stool at the second hand store! Oh the possibilities!


“And will you succeed? Yes indeed, yes indeed! Ninety-eight and three-quarters percent guaranteed!” Dr. Seuss  


I have just found the best link to some great 'life' quotes and I wanted to share it with you.  I am always looking for quotes to inspire, and the author Dodinsky has a plethora of great quotes for any occasion!