Tuesday, May 17, 2011

CRAZY CRAFTING WITH MOSAIC TILE!


WHAT A CRAZY BLAST I had with this Crazy, Creative, Mosaic Tile Project. I have always loved working with tile, because PERFECTION is NOT a necessity, haphazardness in design is encouraged, and the sky is the limit as far as creativity goes! WOOT~ what more can a 'crazy' craft lover ask for?


When picking my latest mosaic project, I thought I would start with a trip to the second hand store (one of my FAV places to shop) and I found this ADORABLE letter Caddy for $2.50! There were several things I loved about this little steal of a deal: a) It has recessed areas for TILING, b) it has a slide up and in lid like a roll top desk, c) I loved the light color of wood, considering that I wanted to use some darker tiles and it would contrast so beautifully. Most people would see a simple box made of wood, I saw a box with a 'beautific' outcome! =) Expand your mind when you go to second hand stores. You need to 'look beyond' the initial presentation of what is being sold to, what the item can become!


So, I have my 'base', my box, now I need my materials. Several years ago, I turned to a wonderfully informative book for beginning mosaic 'tilers' like myself! And this is the best book around! Heidi Borchers'  "Beginner's Guide to Mosaics". I found this book at Hobby Lobby, but I know you can also order it on Amazon, and you might even want to check Ebay. Here is a description of the book: Leisure arts-Mosaics are a snap to create-especially when your teacher is Heidi Borchers! Heidi has developed a simplified approach to the art form that will have you creating lovely tile and glass inlays. from small gift items to enchanting garden enhancements there are designs to please everyone. use an array of materials to transform a variety of surfaces with the time-honored skill of mosaic crafting-made easy. 
( paperback: 44 pages)


I used this book to make my list of things needed, and some ideas about what to put on my box. Here is a basic supply list for any tile project:
  • the 'base' that you will be tiling (mine is the letter box) 
  • Wheeled Tile Nippers (purchased at any craft store) 
  • A Glass Adhesive (I use "Glass, Metal and More by Beacon Adhesives) 
  • Mosaic Tiles of your choice (they can be found in ANY craft store ~ and I am working with pink, green, purple and white) 
  • goggles 
  • gloves 
  • Grout (I used MOSAIC MERCANTILES Mosaic Tile Grout ~ I loved it because it was premixed) 
  • Craft stick or plastic putty knife 
  • grout sealer with sponge 
  • tracing paper 


To begin, I covered my work area with Kraft paper to protect my work surface. For the top inlaid portion of my box, I chose to do a very simple pattern of 'whole' tiles in 4 colors ~ green, pink, purple and white, and I chose to lay them in a simple diagonal pattern. Using my tracing paper, I cut a piece of paper the same size as the inlaid section of the box. I laid my tracing paper on a flat surface and then laid out my tile pattern on the tracing paper to make my design, and make sure it would fit in the inlaid slot. I then photographed the layout so that I would have something to refer back to as I began gluing pieces into place. I began gluing my pieces in place, placing the top row first, and then one side. I then slowly filled in the rest. You only need a small dollop of your adhesive, as you do not want the glue to show around your tile pieces. Also, make sure you leave a small space between the tiles for the grout. After all of your pieces are glued into place, you will want to allow sufficient time for the glue to dry before grouting. I decided to design, create, and glue the front portion of my box first before beginning the grouting process. 


For the inlaid portion on the front of my box, I chose a design from the Basic Mosaic Book as a 'general' guide for my project. I NEVER stick with a set pattern, as I like to make my OWN CRAZY CREATIONS! But I did choose a 'heart' pattern to go onto the front of my box. I liked the shape of the heart, and knew it would fit on my box along with the border I wanted to create around the heart. Once again, I cut a piece of tracing paper the size of the boxes front inlay, and I cut a second piece where I would draw my heart. From the back of the “Beginner’s Guide Book”, I traced the heart pattern from the ‘reflective heart’. (p. 41) onto the second piece of tracing paper, and I cut the heart out of the tracing paper and traced it directly onto the surface of my wood. I then laid the ‘inlaid’ piece of tracing paper out on a flat surface, and began laying out my border around the edge of the paper. I used the green and purple tiles to form the border. NOW for the FUN part! 


laid them in place, and once again photographed my tiles so I could replicate the placement when gluing the pieces in place. 


Here is a GREAT LINK for the proper way to use 
your Wheeled Tile Nippers:


When all was cut and placed, I laid the box down so the front of the box was facing up, and I began gluing the border in place. Next, referring to my photographs, I glued the heart into the heart that 
was traced on the wood. Then referring to the photograph of the outlined portion of the heart, I glued those pieces into place. When all was glued into place, I let the box rest right where it was so the tiles would dry and not shift. 


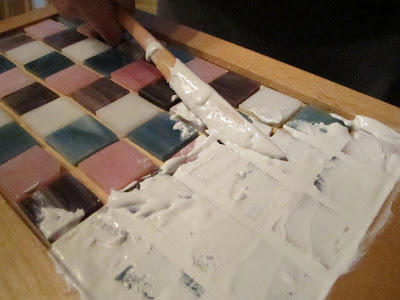
Next comes the grouting. Because I use a premixed grout, I did stir it well before applying it. Using my craft stick, I worked quickly to apply the grout between the mosaic pieces, filling in all the spaces. Then using my sponge grout sealer (with sponge on other side), I ran it completely over the tiled surfaces to fill in every nook and cranny. 


Once the entire project was grouted, I began at the top of the project, and using a slightly damp sponge I rubbed it gently to uncover the tiles and smooth out the grout. Don’t wipe the pieces too much, but leave a grout haze on them. 


I allowed the haze to air dry or if I am in a hurry, I will use a hairdryer on low for several minutes until the haze is dry and looks chalky. I am careful to avoid the damp grout between the pieces. Then using a dry paper towel, I clean each mosaic piece separately. If needed, you can use a cotton swab for any detailed cleaning. I allowed my grout to dry overnight. And then I use vinegar on a cotton swab to clean up any tiles that still have any remaining haze.


And now you see the finished product. SO CUTE… SO EASY… SO INEXPENSIVE. When using mosaic tile your projects are endless, and fun. I hope you will see how easy mosaic tiling is, and how much fun it can be for you to create your very own CRAZY MOSAIC TILE MASTERPIECE! Just a reminder, that the book, Heidi Borchers’ “Beginner’s Guide to Mosaics”, is an incredible resource when you are getting started, so you may want to pick up your own copy. 


Now, trying to decide what creative project, trip, or recipe to share next…. SO MANY CRAZY POSSIBILITIES! Hope you will join me again soon. 


Living, Laughing, and LOVING the “Crazy Colorful Mosaic’ called my life, 


Patti 


Here is a little stool that I tiled to go in my foyer. On this stool, I actually used china plates from the second hand shop ~ broke the plates into pieces, and combined with other tiles. I also got the stool at the second hand store! Oh the possibilities!


“And will you succeed? Yes indeed, yes indeed! Ninety-eight and three-quarters percent guaranteed!” Dr. Seuss  


I have just found the best link to some great 'life' quotes and I wanted to share it with you.  I am always looking for quotes to inspire, and the author Dodinsky has a plethora of great quotes for any occasion!


Sunday, May 15, 2011

My CRAZY INSOMNIA and a POSITIVE "CRAFTY" Message!


"Now I lay me down not to sleep.
I just get tangled in the sheets.
I swim in sweat three inches deep.
I just lay back and claim defeat...
Lids down, I count sheep.
I count heartbeats.
The only thing that counts is that
I won't sleep...My mind is racing,
filled with lists of things to do
and things I've done.
Another sleepless night's begun..."
"Who Needs Sleep?" ~Song By Barenaked Ladies


I have battled the 'insomnia monster' for years.  It is a struggle that I have fought with, cried about, prayed about, sought medical advice about, and have come to ACCEPT.  I know as I age, that it is only going to continue.   I believe my battle is due to my 'racing, creative mind'.  I am constantly thinking about new projects, things I want to accomplish, and my hopes and dreams!  YEP!  my 'right brained thinking' is something that I LOVE about myself, but it is definitely a contributing factor to my insomnia battle.  Here is a great link to understanding insomnia, and reasons that you may battle insomnia.


I thought I would find a 'fun', creative way to poke fun at my 'insomnia issue'!  My dear friend Melissa sent me this adorable picture and suggested it would be perfect for the bedroom.  I HAD TO AGREE... here is the link where you can purchase these adorable ZZZZ's along with so many other fantastic products!  And NOW, my rendition!


I decided to create my Z's because I believe in the power of positive thinking, and seeing the ZZZ's spelled out in front of me is a very positive 'visual' message!  I also decided to create the Z's to match my bedroom.  I have beautiful 'robin's egg blue' walls, and throughout the bedroom, I have used black and white photos,  and red as my accent colors!  My bedroom is SO relaxing and cozy, and SO ME!


Here are the Materials you will need:
  • 3 'Z' letters (I got mine at Michaels)
  • Black and White Acrylic Paint
  • A paint brush
  • A toothbrush
  • Matte acrylic sealer (I love Krylon)


I LOVE enamelware, and I found this adorable Black Enamelware Coffee Pot at a garage sale for $1.00.  This pot served as the creative force for painting my letters!  
Too cute and SO easy... here's what you do!


Paint your Z's with your Black acrylic paints.  I am not sure what my Z's were composed of, but thankfully they only needed one coat of the paint.  Be careful not to use too much paint as you may leave globs or drips on your letters where you don't want them.


After the black paint has dried, lay your letters out, and place a dollop of the white paint in your palette.  Dip your toothbrush into the white paint and scrape it lightly against the edge of your palette so there is not 'too much' paint on the toothbrush.  Hold the toothbrush over the letters, and with your pointer finger, pull against the bristles and flick the paint on the letters.  It does not matter if you get a variety of 'flecks' on your letters... that is the beauty of using this technique.


Allow your white paint to thoroughly  dry, and then using your Krylon matte finish sealer, spray one coat.  Allow the first coat to dry and then spray one more coat.  
Allow to dry thoroughly.


I chose to hang the letters where I could see them from my bed.  I hung them on a wall across from my bed under a little black shelf I have hanging.  I measured down from the base board and centered the letters under the shelf.  Luckily the letters had predrilled holes for hanging.  So I hung them, stepped back and said, "I LIKE, LIKE CRAZY"!  
Too cute, and a powerful positive message with three simple letters.


Now I am getting requests from other family  members for their own "personalized" letter messages.  I love it!  This project took under one hour to complete, it is inexpensive, yet SO priceless.


I hope you will go and have fun making your own Z's, and I hope you will experience some great Z's as you lay down to rest!  Sweet Dreams! ZZZZZZZZZZZZZZZZ................


Living, Loving, Laughing and getting sleepy! = )


Patti


Here is a great link giving some great tips that I myself have implemented to improve my sleep!


Friday, May 13, 2011

a CRAZY GREAT VACATION SPOT- Pensacola, Florida


  I know many people believe that their hometown is the best place to live, but I am just CRAZY enough to believe that my hometown is not only the best place to live, but a CRAZY GREAT VACATION SPOT!


Just a little history from this great link ~ http://www.visitpensacola.com/articles/pensacola-history!


Spanish sailor Don Tristan de Luna arrived in Pensacola on Aug. 15, 1559, establishing the first European settlement in the United States. One month later, a hurricane destroyed supplies, eventually causing the Spanish to flee the area.

In 1698, Fort San Carlos de Austria became the first permanent settlement in Northwest Florida. Remains of the fort can be found at Naval Air Station Pensacola.


Having been ruled by Spain, France, Britain, the Confederacy and the United States, Pensacola has earned the nickname“City of Five Flags.”  The picture above is one I took at a recent festival showing our Five Flags!


I took a trip down to the Pensacola Historic Village which is truly a trip back into the beautiful and rich historical culture of Pensacola Florida!  Here is a link to the Pensacola Historic Village which will give you great information on all the sites there are to see! http://www.historicpensacola.org/


In fact, why not put on your sneakers, and come along on a walk with me, as I give you a picture tour of this Incredible Historic District!


My MOST favorite spot is the Old Christ Church located in the District.  The Old Christ Church was built in 1832, and is a beacon of historic preservation.  Old Christ Church is one of the oldest churches in Florida.  The architecture inside and out is so stunning.  As a violinist, I have played many a wedding and solo concert within this church's walls, and the acoustics are musicians 'dream come true'.  The landscape of the property is strewn with orange trees, that are at this very moment bearing fruit!  This church holds so many memories for me, and I am sure memories for many others from years gone by!


Another lovely home is the Julle Cottage. This well preserved little cottage in Pensacola was constructed in 1805 and was the home of Julee Panton, a free woman of color, well before the Civil War.  The Cottage is just adorable and the grounds are covered with beautiful flowers and plants native to the Gulf Coast.


One of the homes I enjoy, due to a personal interest of mine, is the LaValle House.  This house is separated from the Julle Cottage by a small green space containing this lovely garden... and I do have such an interest in gardening! The garden is planted and maintained by Escambia County Master Gardeners. A variety of greens and lettuce are the winter crop.  In the summer, the kitchen garden has an abundant crop of tomatoes, eggplant, green peppers and squash, and as you can see a few of those beauties are starting to peak out!


One of the more "spirited houses" in the historic district is the Dorr House.  The Dorr House is one of the best-preserved post-Civil War Classic Greek Revival homes still standing in Pensacola, Florida. The deep-yellow house sets closely to the Old Christ Church. This grandeur neighborhood was known for its prestigious residents during the late 1800s.  Clara Barkley Dorr received proceeds upon her husband's death, she purchased the lot on the west side of Seville Square and built the Dorr House.

This home's most infamous secret may be the tales of the spirits that haunt the Dorr home. Tour guides have admitted to being uneasy when giving tours and have told stories of shadows,  pulling on clothes, and reported  objects being moved around.  Historical records show that some of the Dorr children died while living in the home. Locals, who speak of the spirit, believe it is the ghost of Clara who refuses to leave her charming home.  Crazy Spooky!


You will not be left thirsty or hungry as you tour the Historic District.  Two new hot spots getting rave reviews are the Pensacola Bay Brewery, and right next door Dolce!  The Pensacola Bay Brewery,  and the coffee shop are in the perfect setting amongst towering Live Oak Trees with long  flowing strands of Spanish Moss hanging from their branches. 


The Pensacola Bay Brewery, sells souvenir pint glasses and fills them for free. You can also “rent” a pint glass which comes with a free fill of beer with every rental. A popular way to go also is the deal where, if you buy a souvenir mug you get a free sampling of all the beers being currently brewed.  
A fun way to try their 'wares'!


Just next to the Brewery you will run into Dolce!  Dolce is housed in what was originally the shotgun home known as the Moreno Cottage.  The Moreno Cottage was part of a family compound built in 1870.  Dolce is a tiny little cafe serving gelato, coffee, and handmade candies.  
This cute little shop is a sweet stop along your way!


You will also find a wonderful park called "Fountain Square Park".  This picturesque park, located just below Seville Square, provides a memorable outside event location that over looks Pensacola Bay.  I just love the three tier fountain, and the sparkling water in the sunlight.  Also in the park I found some hand carved wooden statues propped up in the trees.  I laughed at the creativity and the spirit in which they were placed and just HAD to take a picture!


Me at work!


I once again have to say, that the Pensacola Historic District is a CRAZY FANTASTIC place to visit... and I haven't even shown you the ocean yet... that is another blog!  Even though I live here, I thoroughly enjoyed stepping back in time to visit this beautiful piece of history! What a treat it would be for you to come for a CRAZY FUN VACATION!


I hope you have enjoyed your walk back in history, and I hope I have given you enough of a 'tease' to want to come visit my CRAZY, BEAUTIFUL hometown~ Pensacola, Florida!

Livin', Laughin' and Lovin' my hometown,


Patti

Come visit my next blog where I will teach you how to use mosaic tiles to spiff up a 2nd hand store steal!


ALSO!!!! HEAD ON OVER TO...‎ 
Jennifer's site, "ALWAYS IN WONDER"
http://www.alwaysinwonder.com/
This AWESOME BLOGGER is giving away a $350 Merry Maids Gift Card.  Uh Huh!  That is what I am talking about.  I would love to win... but would be equally excited if one of my fab followers won!  Just click on the "Current Giveaway" at the top of her page!  Good Luck!